Rails Intro #1: A data management application in five easy steps
I am planning to write a series of articles on how to get started with Ruby on Rails. One of the remarkable things about Rails is that it lets you get up and running very quickly. Here is what you need to do to get your first application up and running.
Before you start, you need to install Ruby on Rails: On Macs, Rails is already available and you can type the following commands in a normal terminal window. On Windows, you can get everything you need from InstantRails. Once you have unpacked InstantRails to a subfolder, start the “InstantRails.exe”. From the GUI that comes up, click the “I” button in the top left corner and select “Rails Applications” -> “Open Ruby Console Window” from the menu. The following commands should be typed in the command line window that shows up.
rails blogdemocd blogdemo- (Optional: Look at how generators work - read the documentation that is printed)
ruby script/generate - (Optional: Look at how generators work - read the documentation that is printed)
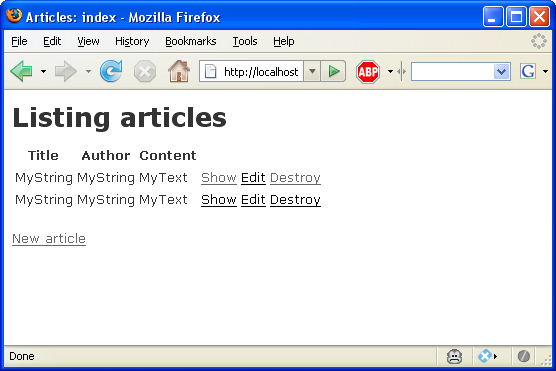
ruby script/generate scaffold ruby script/generate scaffold article title:string author:string content:text- (Optional: Look for the documentation on the “rake” command)
rake --tasks - (Optional: Look for the documentation on the “rake” command)
rake -T db rake db:create:allrake db:migrate- (Optional: Load generated test data into the database)
rake db:fixtures:load - (Optional: Run the generated tests)
rake test ruby script/server- You should now be able to view your wonderful application at http://localhost:3000/articles
- Be sure to read the documentation at http://localhost:3000/ as well
Enjoy your first rails application!
If you find the results satisfying, you should start by exploring the directory structure of the files generated by Rails. In my next article, I will tell you how to generate more advanced data structures, so that we can add comments to our blog articles. (Still to come future: How to setup a server and deploy to it, tips on working with your code, exploring the rails structure, AJAX, and RSS feeds)
Comments:
[Daniel] - Feb 11, 2008
Mac OSX Leopard has Rails pre-installed, just like you said. But it’s an old version, so your tutorial doesn’t work out of the box.
Just run “sudo gem update rails”, type your password, and answer yes to all the questions to get going.
This was a great and compact tutorial by the way. Thanks.
[HSA72] - Jan 28, 2008
Thanks.
I will follow your articles on Rails!
Sarah Brodwall - Mar 18, 2009
Any ideas about what to do if you already have Apache running on your computer?
jhannes - Mar 18, 2009
Apache will prevent InstantRails from starting, but the rest of the tutorial is actually not dependent on this.
[sjbrodwall] - Mar 18, 2009
Any ideas about what to do if you already have Apache running on your computer?
Johannes Brodwall - Mar 18, 2009
Apache will prevent InstantRails from starting, but the rest of the tutorial is actually not dependent on this.